Complete 5–10 Gallon Neocaridina Setup Guide (Beginner Friendly)
A 5–10 gallon aquarium is one of the most stable and beginner-friendly tank sizes for keeping Neocaridina shrimp.
Very small tanks (2–3 gallons) may seem appealing because they save space, but they are much harder to keep stable. Water parameters shift more quickly, temperature fluctuates faster, and small mistakes have bigger consequences.
Larger tanks are generally more stable, but a 5–10 gallon setup strikes an excellent balance between stability and approachability. The additional water volume provides a buffer against sudden swings while still remaining compact, affordable, and easy to maintain.
For beginners, stability matters far more than chasing “perfect” numbers. A properly set up 5–10 gallon tank gives you room to learn without unnecessary risk.
As an Amazon Associate, I earn from qualifying purchases at no extra cost to you.
Equipment You’ll Need for a 5–10 Gallon Neocaridina Tank
Setting up a stable shrimp tank does not require complicated equipment. Simplicity is one of the advantages of keeping Neocaridina.
Tank
A standard 5–10 gallon glass aquarium works perfectly. Rimless tanks are popular for nano setups, but framed tanks are equally effective and often more affordable.
Place the tank on a level, stable surface away from direct sunlight and heating vents. A filled tank in this size range can weigh 50–90 pounds depending on substrate and hardscape.
Substrate
Neocaridina shrimp do not require buffering substrate. A simple inert substrate such as aquarium gravel or sand works well.
While nutrient-rich aquasoils are popular in planted aquariums, they can alter pH and hardness. For beginner Neocaridina setups, inert substrates are typically safer and more predictable.
Gravel is often easier to maintain and vacuum, while sand can create a cleaner aesthetic and may be better suited for rooted plants.
Filter
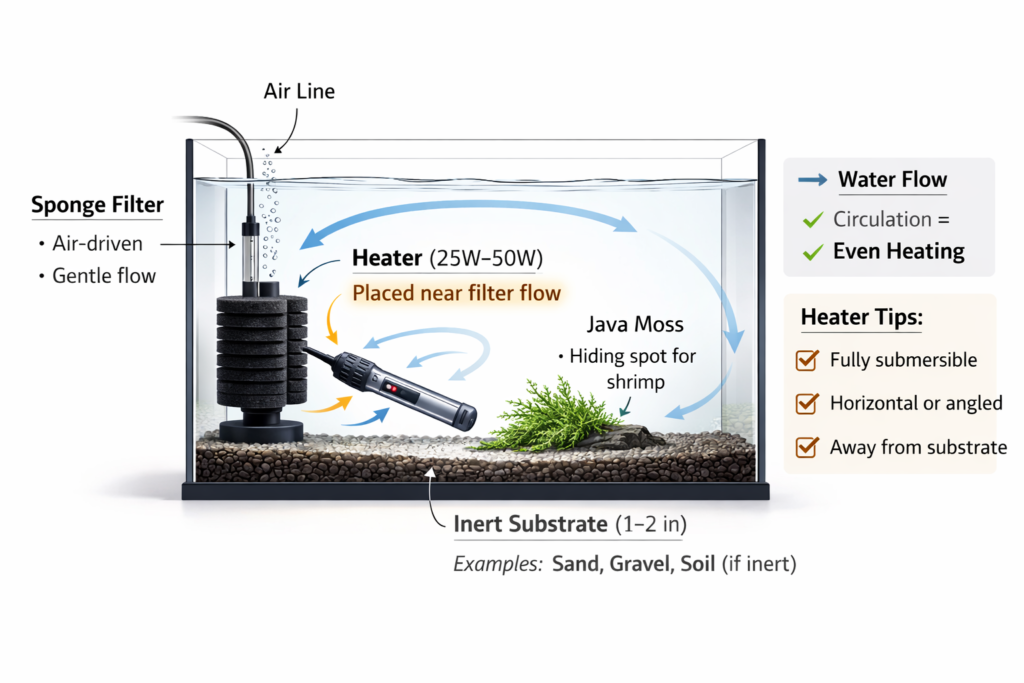
A sponge filter is the safest and most beginner-friendly filtration option. Sponge filters provide gentle water flow, prevent baby shrimp from being sucked in, encourage biofilm growth, and offer excellent biological filtration. A simple beginner sponge filter like this one works perfectly for most 5–10 gallon setups.
A sponge filter requires a small air pump to operate. The air pump pushes air through tubing into the sponge, creating gentle water movement and biological filtration. Most nano air pumps are inexpensive and easy to set up, but they are required for the filter to function.
Sponge filters provide gentle water flow, prevent baby shrimp from being sucked in, encourage biofilm growth, and offer excellent biological filtration.
Hang-on-back filters can also work, but intake guards are strongly recommended to protect shrimplets.
Heater (Optional but Recommended)
Neocaridina can tolerate room temperature in many homes. However, temperature swings are more harmful than steady, slightly cooler water.
If your room consistently drops below 68°F, a small adjustable heater can help maintain stability. Adjustable heaters are preferred over preset nano heaters, as preset models are often set to temperatures slightly higher than ideal for shrimp.
Place the heater near gentle water movement to ensure even heat distribution.
Light
Lighting is primarily for plant growth rather than shrimp. If you plan to include live plants (highly recommended), you will need a basic aquarium light suitable for low to moderate light plants.
Water Conditioner
If you are using tap water, a dechlorinator is essential. Chlorine and chloramine will harm shrimp and beneficial bacteria.
Water Test Kit
A liquid test kit that measures ammonia, nitrite, and nitrate is important during cycling. Testing ensures the tank is safe before adding shrimp.
Most municipal tap water falls within acceptable GH and KH ranges for Neocaridina. However, testing GH and KH becomes more valuable if you plan to breed shrimp or experience molting issues.
Step-by-Step Setup Process
Setting up a 5–10 gallon Neocaridina tank is straightforward if you follow the steps in order. The most important principle is patience — especially during cycling.
It can be hard to wait, but patience during this stage prevents most beginner losses.
Step 1: Rinse and Position the Tank
Place the tank on a level, stable surface away from direct sunlight and heating vents.
Rinse the tank with plain water only. Never use soap or household cleaners.
Step 2: Add Substrate
Add 1–2 inches of inert substrate to the bottom of the tank. This provides surface area for beneficial bacteria and support for plant roots.
If using sand, rinse it thoroughly before adding it to reduce initial cloudiness.
Step 3: Install Equipment
Place your sponge filter inside the tank and connect it to an air pump.
If using a heater, position it near gentle water movement for even heat distribution.
Install your light, but avoid running it for long hours during the cycling phase to minimize algae growth.
Step 4: Fill with Treated Water
Slowly fill the tank with tap water treated with a water conditioner.
Pouring water over a plate or plastic bag helps prevent disturbing the substrate.
Step 5: Cycle the Tank
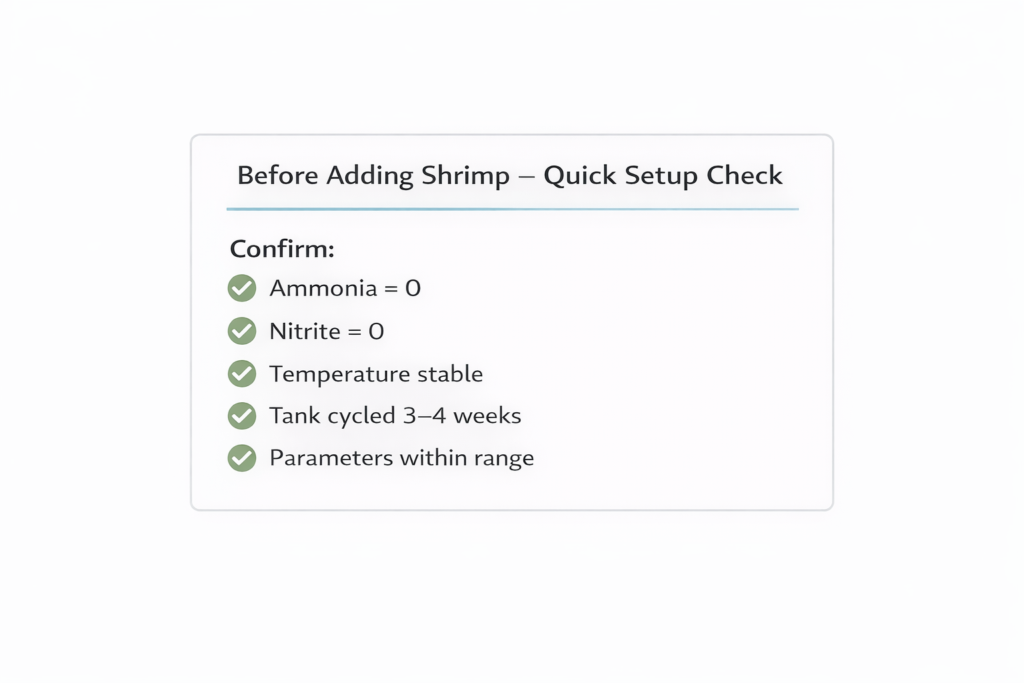
Before adding shrimp, the tank must complete the nitrogen cycle. This process establishes beneficial bacteria that convert ammonia into nitrite, and then nitrite into nitrate.
Cycling typically takes 3–4 weeks.
During this time:
- Test water regularly
- Ensure ammonia and nitrite eventually reach zero
- Confirm that nitrates are present
It can feel like nothing is happening during this stage, but this is when your tank is becoming biologically stable. Shrimp will later graze on the biofilm and microorganisms that develop during this process.
Rushing this step is the most common cause of shrimp loss.
Step 6: Slowly Introduce Shrimp
Once ammonia and nitrite consistently test at zero and parameters are stable, introduce shrimp gradually.
Drip acclimation is ideal because it allows shrimp to adjust gradually to differences in temperature and hardness. If you are unfamiliar with drip acclimation, slowly adding small amounts of tank water to the bag over 30–60 minutes is safer than simply floating and releasing.
Start with a small colony of 8–15 shrimp. This provides enough genetic diversity and increases the likelihood of establishing a breeding colony.
Avoid heavy feeding during the first week and allow them to graze naturally while the tank stabilizes.
Ideal Water Parameters for Neocaridina
Neocaridina are adaptable and do not require extremely precise numbers, but stability is critical.
Instead of chasing exact values, focus on staying within healthy ranges and avoiding sudden swings.
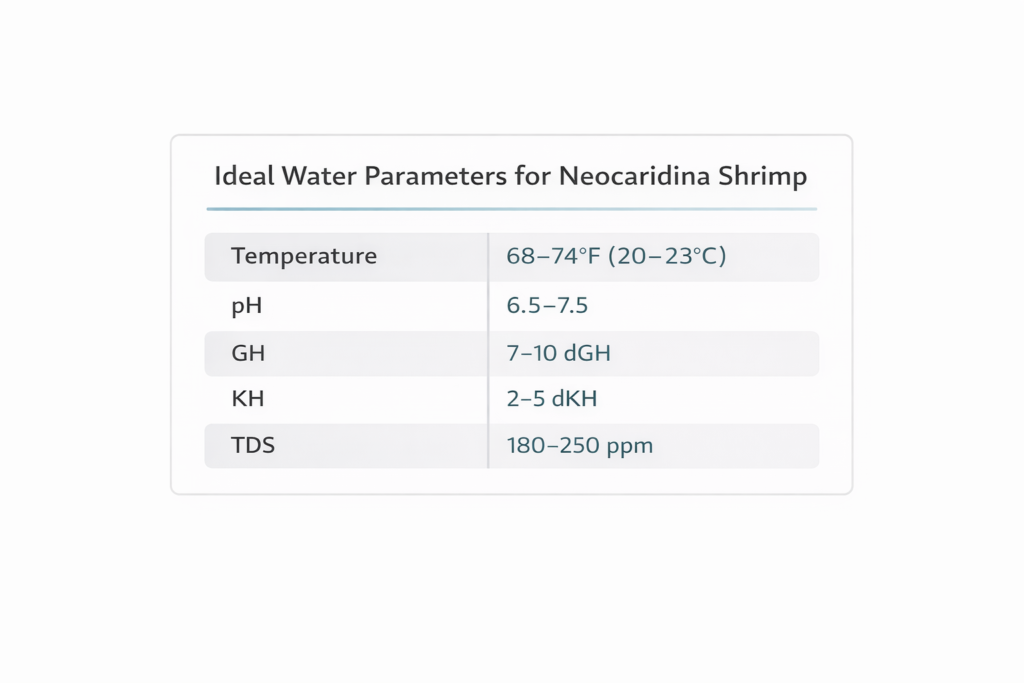
Recommended beginner-safe ranges:
Temperature: 68–74°F
pH: 6.5–7.8
GH: 6–12 dGH
KH: 3–8 dKH
TDS: 150–300 ppm
Ammonia: 0 ppm
Nitrite: 0 ppm
Nitrate: Below 20 ppm
The most important factors are zero ammonia, zero nitrite, and stable hardness levels over time.
Consistency matters more than perfection.
Common Beginner Mistakes
Even well-planned tanks can struggle if common mistakes occur.
Adding shrimp too early
Introducing shrimp before cycling is complete is the most common cause of early losses.
Overfeeding
Shrimp require very little food. Overfeeding quickly fouls water in small tanks.
Large water changes
In a 5–10 gallon tank, large water changes can cause sudden parameter swings. Smaller, consistent water changes (10–20%) are safer.
Skipping mineral stability
If GH is too low, molting issues can occur. While not always necessary for beginners, monitoring hardness becomes important for long-term health and breeding success.
Rushing acclimation
Sudden changes in temperature or hardness can stress shrimp and lead to failed molts.
Simple Maintenance Routine
A 5–10 gallon Neocaridina tank does not require complicated maintenance.
A simple weekly routine is usually enough:
- Perform a 10–20% water change
- Use dechlorinated water
- Check temperature
- Test ammonia and nitrite (especially in newer tanks)
- Feed small amounts 3–4 times per week
As the tank matures, maintenance becomes easier. Healthy shrimp will graze on biofilm and naturally reproduce in a stable environment.